
FAQ - Storage Shed
Answers to the questions our customers ask most about this product category.
About Dimension
The product I received does not match the description.
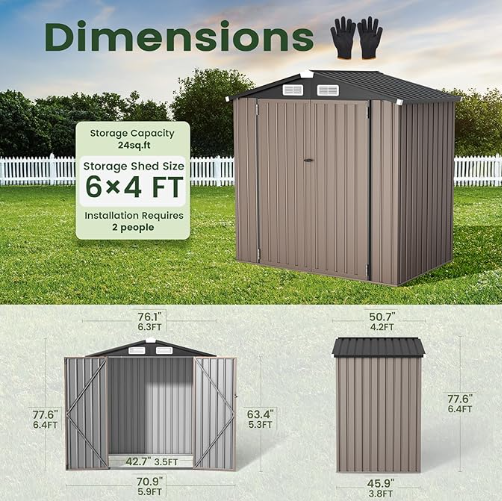
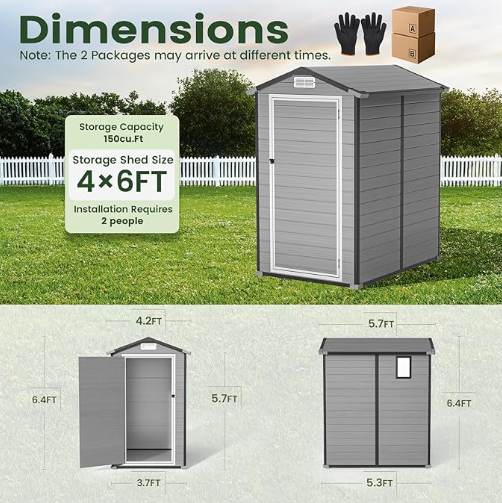
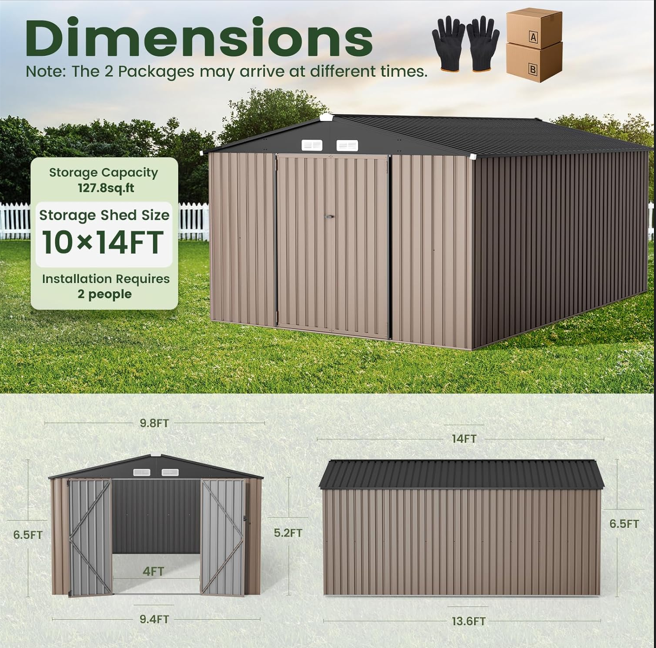
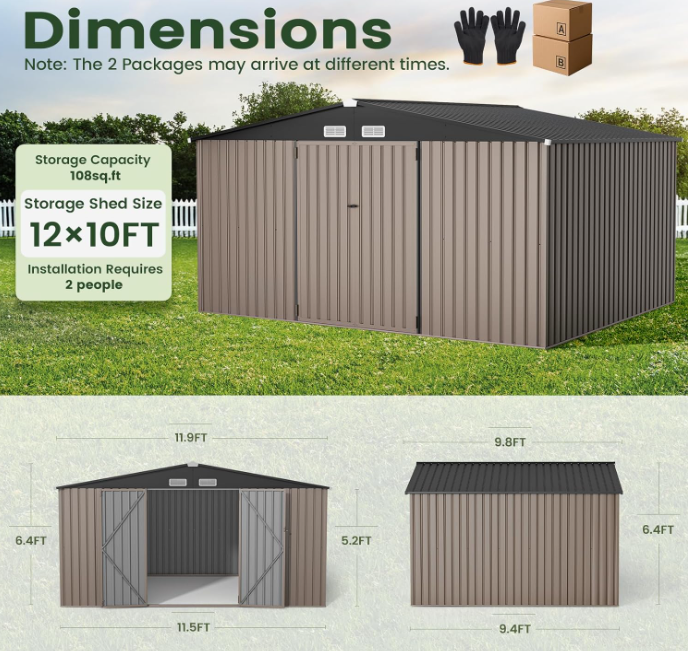
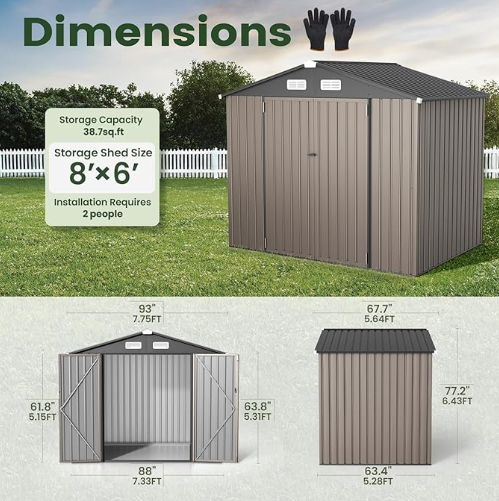
Actual product dimensions are subject to the measurements displayed on the main image in the link.
The main picture includes: dimensions with the roof and dimensions of the shed structure without the roof.
6*4FT Metal Storage Shed:
4*6FT Resin Plastic Shed:
10*14FT Metal Storage Shed:
10*12FT Metal Storage Shed:
8*6FT Metal Storage Shed:
How thick are the walls and floors of the shed?
4*6FT Resin PLastic Shed
Wall: 14mm
Floor: 14mm
Full size Metal Storage Shed(6*4 / 8*6 / 10*12 / 10*14FT)
Wall: 0.25mm
Floor: 14mm
Door dimensions for all storage shed
4*6FT Resin PLastic Shed
Door Width: 721 mm (approx. 28.4 inches)
Door Height: 1594 mm (approx. 62.8 inches)
Full size Metal Storage Shed(6*4 / 8*6 / 10*12 / 10*14FT)
Door Width: 1.2 meters (approx. 47.2 inches)
Door Height: 1.6 meters (approx. 63 inches)
About Material
What is the material of the storage shed?
4*6FT Plastic Storage Shed
Main Material: High-grade Thermoplastic Resin
Floor: PP This is the primary material used in this product. Compared to traditional wood or ordinary plastic, it offers the following characteristics:
- Structure: Features a 14mm-thick double-wall panel design, which enhances structural strength and durability.
- Weather Resistance: It is waterproof, corrosion-resistant, UV-resistant, and fade-resistant.
- Stability: It withstands various weather conditions and is resistant to warping or cracking.
Full size Metal Storage Shed(6*4 / 8*6 / 10*12 / 10*14FT)
Main Material: Color-Coated Steel / Prepainted Steel
Floor: PP
In addition to galvanization, the surface undergoes an electrostatic spraying or baking process.
• Features: In addition to rust prevention, it offers a variety of colors (such as dark gray, grass green, and brown) to complement garden landscapes.
• Advantages: Provides an additional protective layer for enhanced weather resistance.
About Shipping
How many packages to expect for my order?
10*12/10*14FT: 3 Packages
8*6FT with/without floor: 2 Packages
6*4FT Metal: 1 Package
4*6FT Plastic: 2 Packages
Where can I find all the tracking numbers?
AMAZON
Please note that Amazon’s system only allows us to display one tracking number on the order summary page. To view the tracking numbers for all your packages, please follow these steps:
- Log in to your Amazon account.
- Go to "Account & Lists" and select "Your Messages".
- Look for the message from us with the subject line related to your order shipment.
- Inside that message, you will find a full list of tracking numbers for all your packages.
If you cannot find the email, please check your "Buyer/Seller Messages" folder within your Amazon account, as these notifications are sent directly through the Amazon messaging system.
WALMART
The Walmart platform supports displaying information for multiple packages simultaneously:
- Log in to your Walmart account.
- Go to “Order History.”
- Click “Track Package” under the relevant order, and the platform will display the latest status and tracking numbers for all split packages.
TEMU
Temu platform requires that all shipping information be displayed directly on the platform:
- Please log in to your Temu app or website.
- Tap “You” -> “Your Orders”.
- On the corresponding order details page, you can view all package groups and their respective tracking numbers.
Why aren't packages delivered at the same time?
This is completely normal! Even when shipped together, carrier sorting processes can occasionally cause packages to take different routes or be delivered by different trucks. Please allow an extra 1–2 business days for the second package to arrive.
About Assembly
Installation Video
6*4FT Metal Storage Shed: 6×4 FT Shed User Guide – GVDV
8*6FT Metal Storage Shed: 8×6 FT Shed User Guide – GVDV
10*12FT Metal Storage Shed: 10×12 FT Shed User Guide – GVDV
10*14FT Metal Storage Shed: 10×14 FT Shed User Guide – GVDV
4*6FT Plastic Shed: Currently Don't Have
Which box is the instruction manual in?
2 Packages storage shed: In Box B (2 of 2).
3 Packages storage shed: in Box C (3 of 3).
How long does it usually take to assemble?
Depending on your experience and the size of the shed, it typically takes one full day. We suggest sorting all parts and hardware before starting to speed up the process.
We strongly recommend that two or more people perform the installation together, as this will significantly improve efficiency.
Do storage sheds need to be bolted down to a frame, or can they just sit on top?
Yes, you must securely anchor the shed to your base frame. We strongly advise against allowing the shed to sit unattached on a deck or platform.
Why Anchoring Is Essential: Our storage sheds are pre-fabricated, non-permanent structures. Bolting the frame securely to your base prevents high winds from shifting, tipping, or dislodging the structure.
What is the best location to build my outdoor shed for wind protection?
To maximize stability and minimize wind exposure, we recommend assembling your shed in a partially sheltered location:
Next to a main house wall or garage
Adjacent to a sturdy perimeter fence
Near natural windbreaks (such as dense hedges or tree lines)
Do I need professional tools to assemble this shed?
No, this shed is designed for DIY assembly. You will only need basic tools like a screwdriver, a power drill (on low torque), a ladder, and a pair of work gloves. We recommend having two people for the assembly process, especially when installing the roof panels.
Do I need to prepare a foundation for the shed?
To ensure the stability and longevity of your shed, we strongly recommend installed on a level, solid foundation (such as a concrete pad, a wooden deck, or a leveled area with pavers).
Installing on uneven ground can cause the panels to misalign and the doors to stick.
Does it need to be installed on a completely level area/floor?
To answer your questions directly: It is absolutely vital and highly recommended to have the base resting on a completely level area. Here is why a level surface is non-negotiable for metal/plastic sheds:
Prevents Misalignment: If the ground is even slightly uneven, the entire frame will twist. As you build upward, this causes panels to warp, screw holes to become misaligned, and the roof parts to not fit together properly.
Ensures Proper Door Function: Even a minor slope at the base can lead to warped door frames later on, meaning the doors may not close, latch, or slide properly.
Our Best Advice:
To ensure a smooth, frustration-free assembly where all panels line up perfectly, please take the extra time now to make the base 100% flat and level. Getting it right at the foundation stage will save you a lot of time and effort during the rest of the build.
I'm stuck on page 46 of the manual. Does the long lip of Part DDA go on the interior or exterior?
Regarding the assembly on Page 46 of the instruction manual, here is how Part DDA should be positioned:
- The LONG side of Part DDA should face the OUTSIDE of the storage shed.
- The SHORT side of Part DDA should face the INSIDE of the storage shed.
💡 Quick Tip for Installation: > When you look at the side profile, ensure that the longer edge is oriented toward the exterior to guarantee proper alignment and weatherproofing for your shed.
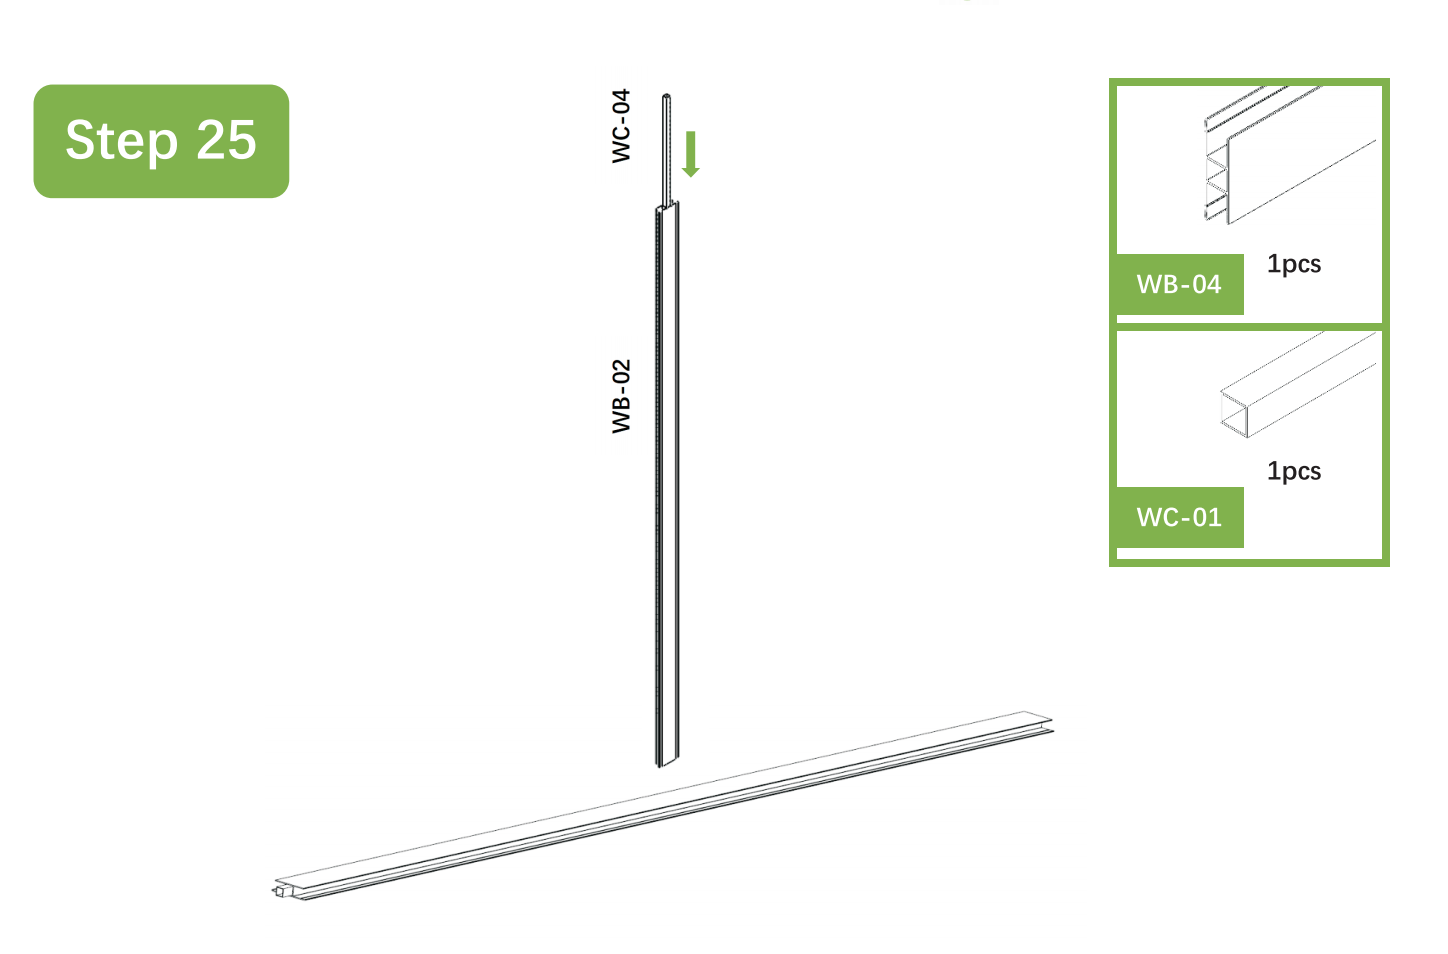
Missing WC-04
As shown in Step 25 of your assembly manual, they are often pre-inserted inside Part WB-02 (the H-shaped frame)
- Action: Please check both ends of the WB-02 frame to see if the WC-04 tubes are already installed inside.
Missing Floor
Please note that the flooring is not a separate package.
What to look for: Look for gray short planks inside the main box.
Double-check: Carefully unpack and inspect all corners of the box.
Verification: If the flooring is definitely not there, please take a photo of all the accessories you have received together and send it to our support team. Once we verify the photo, we will provide you with a prompt solution.
About Quality issue
Water Leakage
Verify if there are any gaps from improper installation and ensure all screw washers are correctly installed. If leakage persists, contact support with photo and video evidence. (support@gvdv.com).
Missing Hole
- The "Comparison" Photo: If you have an identical part that has holes, please lay the "un-drilled" part right next to the "correct" one and snap a photo.
- If it’s a unique part, simply hold it up against the piece it’s supposed to connect to, showing us exactly where the holes are missing.
- The Part ID: Tell us the Part Number (e.g., Part K1012-3L / DLA) found in your assembly manual.
- Contact us with above photos info: support@gvdv.com
Holes not Align
Step 1: The "Loose Screw" Check (Self-Troubleshoot)
Quick Check: Please ensure all previous screws in the frame are loosely tightened. If you tighten everything 100% too early, the frame loses the flexibility needed for final alignment.
What to do: Go back to the surrounding screws you just installed and loosen them by 50%. And tighten them gradually and evenly in a parallel fashion rather than tightening one completely before the next.
Step 2: Manufacturing Deviation Check (To Support)
If loosening the screws didn't work, the part might have been punched incorrectly at the factory. To do this, we need "The Gap Photo" as proof for the factory.
Depending on your situation, please take the photo like this:
- Method A: The "Twin Part" Compare (If you have 2 identical parts)
If you have two of the same panels (e.g., two Left Wall Panels), but only one has a problem:
Stack the "Good Part" directly on top of the "Bad Part."
Align the edges perfectly.
Take a photo showing how the holes do not match between the top and bottom layers.
- Method B: The "Connect Check" (If it’s a unique part)
If you only have one of that part and it won't fit its neighbor:
Hold the two parts together exactly as the manual shows.
Line up one hole and put a screw through it (don't tighten).
Look at the other holes. If the part is defective, you will see the metal/plastic of the panel blocking the hole underneath.
Take a close-up photo of the blocked hole. It should clearly show that "Hole A" and "Hole B" are physically impossible to meet.
At the end: Contact us with above photos info: support@gvdv.com
Gaps/Won't close properly
- Ensure that the installation is carried out strictly in accordance with the instructions.
- The correct parts and screws were used for installation, and the panel is oriented correctly.
- Confirm the hole positions are aligned and everything else appears to be in order, but the problem persists.
- Contact us with problem video info: support@gvdv.com
Rust
Our metal panels undergo a multi-layer protective coating process designed to prevent rust under normal conditions. However, surface oxidation can occasionally occur due to environmental factors, which are beyond our control:
- Shipping & Handling Friction: During the long-distance transit process, minor scuffs or scratches may occur if heavy packages shift. If the protective coating is microscopically scratched, exposed metal can react to humidity in the air.
- Condensation & Moisture: Especially in areas with high humidity or during temperature fluctuations (day vs. night), natural condensation can form inside the shed. If the environment is not well-ventilated, this trapped moisture can cause surface oxidation.
- Environmental Exposure: Factors such as salty air (coastal areas), heavy rain, or contact with chemicals/fertilizers stored nearby can accelerate the oxidation process on any exposed metal surface.
- We highly recommend inspecting your panels upon delivery and applying a light coat of clear sealant or touch-up paint to any minor scratches found during assembly. This simple step ensures your shed remains rust-free and durable for years to come.
Small surface rust can be easily treated to prevent it from spreading.
- Gently Clean: Use a soft wire brush or sandpaper to lightly remove the surface rust.
- Clean & Dry: Wipe the area clean with a damp cloth and make sure it is completely dry.
- Apply Touch-up Paint: Apply a small amount of exterior-grade metal touch-up paint or a rust-preventative primer/sealant over the area. This will seal the metal and protect it from further exposure to the elements.
How to Curb & Prevent Rust Development:
- Protect the Base Wells:Because water naturally collects in the hollow wells around the base hardware, wipe away trapped water after heavy rain, or apply a thin layer of outdoor silicone sealant over the screw heads to seal out standing water.
- Apply Anti-Rust Spray:Spray a protective coating such as WD-40 Specialist Corrosion Inhibitor or Boeshield T-9 around the pole intersections and bolt connection points. This creates a clear barrier against moisture.
- Touch-Up Painting:If there are minor scratches on the pole joints from assembly, applying a quick layer of Rust-Oleum clear coat or black rust-inhibiting spray paint will prevent rain from reaching the raw metal inside.
SNOW LOAD
Why is there a difference in load-bearing capacity between a shed and a house?
The primary difference lies in the structural engineering and materials.
Residential Houses: Built over 7–12 months using heavy-duty lumber and reinforced concrete. They are designed to meet strict local building codes for permanent habitation.
Storage Sheds: Designed for affordability and DIY convenience, featuring a lightweight metal panel design that can be assembled in 3–4 hours. While they are durable for storage, they are not engineered to match the structural load capacity of a permanent building.
Is the metal shed "snow-proof"?
Our sheds are weather-resistant, meaning they protect against rain, wind, and light snow. However, no lightweight metal structure is completely "snow-proof" against heavy accumulation.
Snow weight varies significantly:
Dry Snow: Light and fluffy.
Wet/Packed Snow: Can weigh up to 20 lbs per cubic foot.
When snow accumulates and is not cleared, the cumulative weight can exceed the physical limit of the metal panels, regardless of the brand or quality.
Does a roof collapse mean the product is defective?
Not necessarily. A collapse due to heavy snow is typically classified as environmental/weather-related damage rather than a manufacturing defect. Just as a heavy storm can down a tree or damage a car, extreme snow accumulation is a natural force that can exceed the design limits of portable outdoor structures.
How can I prevent snow damage in the future?
We recommend the following maintenance tips for all metal outdoor structures:
Periodic Clearing: Use a long-handled snow rake to gently remove snow from the roof after every 4–6 inches of accumulation.
Internal Reinforcement: In areas with heavy winters, some users choose to add interior wooden bracing (DIY) for extra support during peak months.
Site Leveling: Ensure the shed is on a perfectly level foundation to ensure the weight is distributed evenly across the frame.
How long do these sheds typically last?
A: With proper maintenance (including rust prevention and snow clearing), a metal shed can provide excellent service for many years. Because it is a "ready-to-assemble" product, its longevity is directly tied to the care it receives during extreme weather events.
WIND SAFETY
Is this storage shed windproof?
This shed is a lightweight metal assembly structure designed for daily storage. While it is stable under normal weather conditions, it is not a permanent building. In the event of extreme weather—such as gales, storms, or typhoons—the large surface area of the panels can act like a sail, creating significant wind lift.
Why did my shed tip over or get damaged in high winds?
If the shed is not securely anchored to the ground, high-speed winds can exceed the structural load capacity, leading to tipping or structural failure. This is typically considered an "Act of Nature" rather than a product defect. We strongly recommend using professional anchoring kits for safety.
How can I secure my shed to prevent wind damage?
Depending on your surface, we recommend:
Concrete Ground: Use Expansion Bolts through the pre-drilled holes in the base frame.
Soil/Grass: Use Heavy-duty Ground Anchors and tie-down ropes (minimum 30cm deep).
General: Placing heavy weights (sandbags or concrete blocks) inside the four corners can also help lower the center of gravity.
What should I do when a storm or high wind warning is issued?
Close and Lock: Ensure all doors and vents are tightly closed to prevent wind from entering and creating internal pressure.
Reinforce: Check that all screws are tight and anchors are secure.
Clearance: Remove any lightweight objects near the shed that could fly into and damage the panels.
Is wind damage covered under warranty?
Our warranty covers manufacturing defects (such as missing parts or structural flaws out of the box). However, damage caused by extreme weather, natural disasters, or improper anchoring is not covered.
Browse other categories
Still need help?
Our customer care team is happy to answer product, order, and warranty questions.
Contact us